From GLB to JSX: Integrating 3D Models into Your React App

In React, we can use tools like gltfjsx package to convert 3D models from GLB or GLTF formats into *.jsx components for rendering within a React application.
GLTF (GL Transmission Format): A JSON-based format for 3D scenes and models, including meshes, textures, and animations, designed for efficient web transmission as seperate files.
GLB: A compact, binary version of GLTF that includes all resources in a single file, ideal for efficient 3D content transfer and use in web applications.
To make it easier to understand, I'm going to use both GLB and GLTF files of the same model and explain how we can convert 3D files into JSX components in both cases
Create a new React app using Create React App blogpost
Install react-three-fiber package
npm install three @types/three @react-three/fiber @react-three/drei
glb on the browser (glb to jsx)Download this 3d model Merc Hovercar from Sketchfab and save the file inside the public > 3dModel folder.
Use the CLI to navigate to the 3dModel folder. Ideally, the 3dModel should be inside the public > 3dModel folder.
cd .\public\3dModel\
Now run the following command to generate a jsx file and compressed version of the model (the textures will be converted to webp)
npx gltfjsx free_merc_hovercar.glb --draco
This command installs the
gltfjsxnpm package and converts theGLTFfile to[fileName]-transformed.glb
The
[fileName].jsxfile will also be generated inside the folder.
If you don’t need to compress the texture, then remove the
--dracoflag.
or run the following command if you are inside gltf model folder
npx gltfjsx .\scene.gltf --draco
This will only generate a
jsxfile inside the folder
Let's take a look at the generated file.
import React, { useRef } from "react";
import { useGLTF } from "@react-three/drei";

export function Model(props) {
  const { nodes, materials } = useGLTF("/free_merc_hovercar.glb");
  return (
    <group {...props} dispose={null}>
      <group
        position={[0.019, -0.066, -0.047]}
        rotation={[-Math.PI / 2, 0, 0]}
        scale={0.496}
      >
        <mesh
          geometry={nodes.Plane006_0.geometry}
          material={materials["Material.001"]}
        />
        <mesh
          geometry={nodes.Plane006_1.geometry}
          material={materials.Material_light}
        />
        <mesh
          geometry={nodes.Plane_0.geometry}
          material={materials.Plane_0}
          position={[0, 0, -0.582]}
          scale={[1.187, 2, 1]}
        />
      </group>
    </group>
  );
}

useGLTF.preload("/free_merc_hovercar.glb");
Change the model name to something meaningful
export function FlyingCar(props)
Then move the *.jsx file to src>components>3dModel>FlyingCar.jsx
Next, we need to update the file path.
In React, the default path for referencing any file starts from the public directory, and our model resides in this folder.
Therefore, we can specify the path as 3dModel/free_merc_hovercar.glb
import React, { useRef } from "react";
import { useGLTF } from "@react-three/drei";

export function FlyingCar(props) {
  const { nodes, materials } = useGLTF("3dModel/free_merc_hovercar.glb");
  return (
    <group {...props} dispose={null}>
      <group
        position={[0.019, -0.066, -0.047]}
        rotation={[-Math.PI / 2, 0, 0]}
        scale={0.496}
      >
        <mesh
          geometry={nodes.Plane006_0.geometry}
          material={materials["Material.001"]}
        />
        <mesh
          geometry={nodes.Plane006_1.geometry}
          material={materials.Material_light}
        />
        <mesh
          geometry={nodes.Plane_0.geometry}
          material={materials.Plane_0}
          position={[0, 0, -0.582]}
          scale={[1.187, 2, 1]}
        />
      </group>
    </group>
  );
}

useGLTF.preload("3dModel/free_merc_hovercar.glb");
We have to create a boilerplate code for displaying a 3d model using react three fiber. Create a new route and page to display the 3d model. Now open the page file. In my case my page file is GlbModel.jsx
import { Canvas } from "@react-three/fiber";
import { CameraControls, PerspectiveCamera } from "@react-three/drei";

function GlbModel() {
  return (
    <>
      <title>GLB Model</title>
      <main className="px-5">
        <div className="border-2 h-[700px] my-5 rounded-lg">
          <Canvas>
            <PerspectiveCamera
              makeDefault
              fov={75}
              position={[0, 0, 2]}
              resolution={1024}
            />
            <CameraControls />
            <ambientLight intensity={0.5} />
          </Canvas>
        </div>
      </main>
    </>
  );
}

export default GlbModel;
Now, import the 3D model. Since the 3D model may load more slowly and asynchronously compared to the page, we also need to import Suspense from React.
import { Canvas } from "@react-three/fiber";
import { Suspense } from "react";
import { CameraControls, PerspectiveCamera } from "@react-three/drei";
import { FlyingCar } from "../components/3dModels/FlyingCar.jsx";

function GlbModel() {
  return (
    <>
      <title>GLB Model</title>
      <main className="px-5">
        <div className="border-2 h-[700px] my-5 rounded-lg">
          <Canvas>
            <PerspectiveCamera
              makeDefault
              fov={75}
              position={[0, 0, 2]}
              resolution={1024}
            />
            <CameraControls />
            <ambientLight intensity={5} />
            <Suspense>
              <FlyingCar></FlyingCar>
            </Suspense>
          </Canvas>
        </div>
      </main>
    </>
  );
}

export default GlbModel;
The 3d model is not looking good. We can use hdr image to improve the look even furthur.
import { Canvas } from "@react-three/fiber";
import { Suspense } from "react";
import {
  CameraControls,
  PerspectiveCamera,
  Environment,
} from "@react-three/drei";
import { FlyingCar } from "../components/3dModels/FlyingCar.jsx";

function GlbModel() {
  return (
    <>
      <title>GLB Model</title>
      <main className="px-5">
        <div className="border-2 h-[700px] my-5 rounded-lg">
          <Canvas>
            <PerspectiveCamera
              makeDefault
              fov={75}
              position={[0, 0, 2]}
              resolution={1024}
            />
            <CameraControls />
            <ambientLight intensity={1} />
            <Suspense>
              <FlyingCar></FlyingCar>
            </Suspense>
            <Environment background={false} preset={"apartment"} />
          </Canvas>
        </div>
      </main>
    </>
  );
}

export default GlbModel;
If you are confuse about how the
hdrimage working, you can check the official documentation Basically somehdrare already provided in the@react-three/dreipackage and we can use those using the current preset likeapartment,city,forest,studioetc.
If you like to use your own hdr image then you can store the hdr image on public > hdr > dry_field_01k.hdr and use the image like the following code
import { Canvas } from "@react-three/fiber";
import { Suspense } from "react";
import {
  CameraControls,
  PerspectiveCamera,
  Environment,
} from "@react-three/drei";
import { FlyingCar } from "../components/3dModels/FlyingCar.jsx";

function GlbModel() {
  return (
    <>
      <title>GLB Model</title>
      <main className="px-5">
        <div className="border-2 h-[700px] my-5 rounded-lg">
          <Canvas>
            <PerspectiveCamera
              makeDefault
              fov={75}
              position={[0, 0, 2]}
              resolution={1024}
            />
            <CameraControls />
            <ambientLight intensity={1} />
            <Suspense>
              <FlyingCar></FlyingCar>
            </Suspense>
            <Environment
              background={true}
              files={["/hdr/dry_field_01k.hdr"]}
            />
          </Canvas>
        </div>
      </main>
    </>
  );
}

export default GlbModel;
We can improve the hdr even furthur by adding the ground projection attribute to the Environment tag.
import { Canvas } from "@react-three/fiber";
import { Suspense } from "react";
import {
  CameraControls,
  PerspectiveCamera,
  Environment,
} from "@react-three/drei";
import { FlyingCar } from "../components/3dModels/FlyingCar.jsx";

function GlbModel() {
  return (
    <>
      <title>GLB Model</title>
      <main className="px-5">
        <div className="border-2 h-[700px] my-5 rounded-lg">
          <Canvas>
            <PerspectiveCamera
              makeDefault
              fov={75}
              position={[0, 0, 2]}
              resolution={1024}
            />
            <CameraControls />
            <ambientLight intensity={1} />
            <Suspense>
              <FlyingCar></FlyingCar>
            </Suspense>
            <Environment
              background={true}
              files={["/hdr/dry_field_01k.hdr"]}
              ground={{
                height: 5, // Height of the camera that was used to create the env map (Default: 15)
                radius: 120, // Radius of the world. (Default 60)
                scale: 10, // Scale of the backside projected sphere that holds the env texture (Default: 1000)
              }}
            />
          </Canvas>
        </div>
      </main>
    </>
  );
}

export default GlbModel;
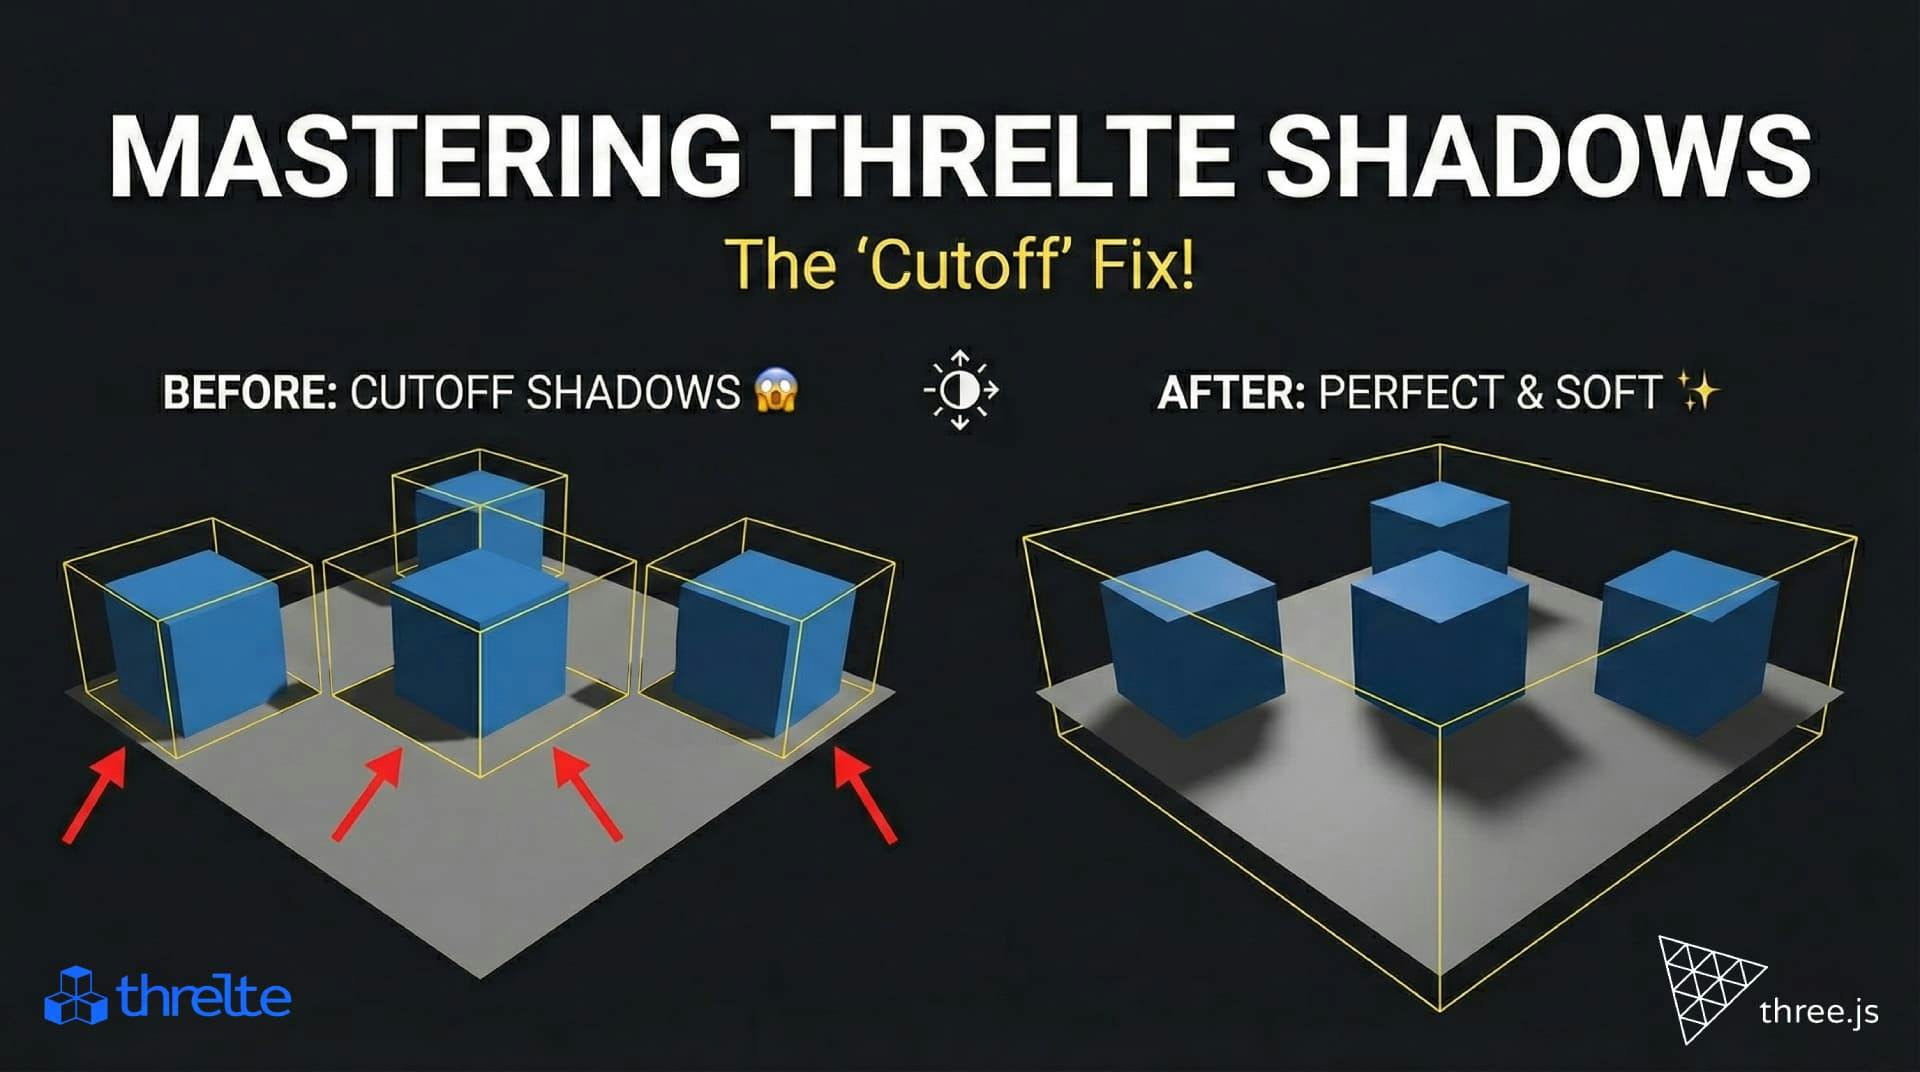
Shadows disappearing in your Threlte or Three.js scene? It’s a frustum issue. Learn how to visualize the shadow box and fix clipping instantly with this guide.

Improve user experience in your React SPA by using client-side routing techniques instead of traditional anchor tags.

Understand side effects in React, why they are essential, and how to manage them using the useEffect hook. Learn with practical examples and tips.