How to Install Frappe 16 on WSL with Python 3.14

Welcome to the future of ERP development! If you're looking to set up Frappe 16 on your Windows machine using the Windows Subsystem for Linux (WSL), you've landed on the perfect guide. 🎯
In this article, we'll walk you through setting up a lightning-fast development environment using Python 3.14, Node.js 24, and the latest Frappe Bench. Whether you're building a custom app or exploring ERPNext, this guide ensures you have a rock-solid foundation. Let's dive in! 🌊
Before we start the heavy lifting, let's ensure your system is ready. We'll be using Ubuntu on WSL.
First things first, we need Git for version control.
sudo apt install git -yFrappe relies on a few core libraries to function correctly, including PDF generation tools and database connectors.
sudo apt install libffi-dev mariadb-server libmariadb-dev libssl-dev wkhtmltopdf redis-server nginx -yWhy these?
wkhtmltopdfhandles PDF generation,redismanages caching/queueing, andnginxserves your site in production (though we use a dev server here).
We recommend using Volta to manage your JavaScript tools. It's faster and less error-prone than NVM.
curl https://get.volta.sh | bash
source ~/.profileWith Volta, pinning versions is a breeze! 🍃
volta install node@24
volta install yarn@1.22Frappe 16 leverages the performance improvements of Python 3.14. Since this version might not be default in your distro yet, we'll use the reliable deadsnakes PPA.
sudo apt update
sudo apt install software-properties-common
sudo add-apt-repository ppa:deadsnakes/ppa
sudo apt update*� Why
deadsnakes/ppa? The official Ubuntu repositories tend to be conservative, sticking to older, stable Python versions. The Deadsnakes PPA (Personal Package Archive) is the community-trusted source for installing newer (or older) Python versions that aren't yet available by default in your OS.
sudo apt install python3.14 python3.14-venv python3.14-dev -y*� Why the
-yflag? This flag stands for "yes". It automatically answers "yes" to any confirmation prompts during installation. This is super handy for scripts or when you just want to get things done without hittingy+Enterrepeatedly!
Linux systems often have multiple versions of Python installed side-by-side (e.g., Python 3.10 for the system, Python 3.14 for us).
Check what you have:
cd /usr/bin
ls -l | grep python3*� What to look for: You might see
python3.10,python3.12, andpython3.14. This is normal! We install 3.14 specifically to access the latest features required by Frappe 16, without breaking the system tools that rely on the older default version.
Keep your projects clean by isolating dependencies. We'll create a dedicated virtual environment for your Frappe setup.
Navigate to your desired project folder:
cd ~/projects  # changes this to your actual path
python3.14 -m venv env14*� Why
python3.14 -m venv? By explicitly callingpython3.14, we tell the system: "Create this virtual environment using THIS specific version of Python." If we just ranpython3 -m venv, it might default to the older system version (like 3.10), causing compatibility issues later.
source env14/bin/activatePro Tip: You'll see
(env14)appear in your terminal prompt.
The Bench CLI is the heart of the Frappe ecosystem using Frappe Bench. It manages your sites and apps.
pip install frappe-benchLet's create a new bench named f16. This downloads the framework and sets up the directory structure.
bench init f16 --frappe-branch version-16 --python python3.14*� Why specify
--python python3.14again? Bench is smart, but we want to be explicit. This flag ensures that the Bench environment itself—and every app you install inside it—uses our shiny new Python 3.14 executable, preventing it from accidentally falling back to the system default.
Move into your new bench directory:
cd f16By default, Frappe uses MariaDB. Let's create your first site!
bench new-site mysite.localReplace mysite.local with your desired site name.
🔐 Heads Up:
- You will be asked for the MariaDB root password (if you haven't set one, it might be blank or requries setup).
- You will be asked to set the Administrator password for the new site. Remember this!
Tell bench which site to use by default and enable developer features.
bench use mysite.local
bench set-config developer_mode 1*� Single Tenant vs Multi-Tenant:
- Single Tenant (Our Setup): We rely on port-based access (like
localhost:8000). This is perfect for local development.- Multi-Tenant: Used in production to host multiple sites on one server using DNS (e.g.,
site1.com,site2.com).We also trigger Developer Mode (
developer_mode 1). This unlocks critical features like creating new apps and editing DocTypes directly in the file system—capabilities that remain locked in production sites.
Time to see the magic happen! ✨
bench startOpen your browser and visit: http://localhost:8000
Log in with Administrator and the password you just set.
Prefer Postgres over MariaDB? Frappe 16 supports it seamlessly! Here is how to configure it.
sudo apt update
sudo apt install postgresql postgresql-contrib -yIt's easiest to create a superuser capable of creating databases for local dev.
sudo -u postgres createuser --interactive --pwprompt*� Why do this? Running this command as the
postgresuser (the database administrator) creates a new role with superuser privileges. This ensures your local user has full permission to create databases and tables without constantly hitting "Access Denied" errors during development.
sabbir). y. sudo -u postgres createdb $(whoami)*� Why create a DB with my username? PostgreSQL has a neat convenience feature: if you type
psqlwithout specifying a database, it tries to connect to a database that matches your username. Creating this now means you can drop into the database shell instantly just by typingpsql!
Ensure the elephant is running: 🐘
sudo systemctl start postgresql
sudo systemctl enable postgresqlTo use Postgres instead of MariaDB for a specific site:
bench new-site pg-site.local --db-type postgresOr fully explicit command:
bench new-site pg-site.local --db-type postgres --db-host localhost --db-root-user postgres --db-root-password [your_root_pass] --db-name pg-site.local --db-password [site_pass]
The complete guide to running pgAdmin 4 Web in WSL. Learn how to install, configure, and connect to your PostgreSQL database directly from your Windows browser.
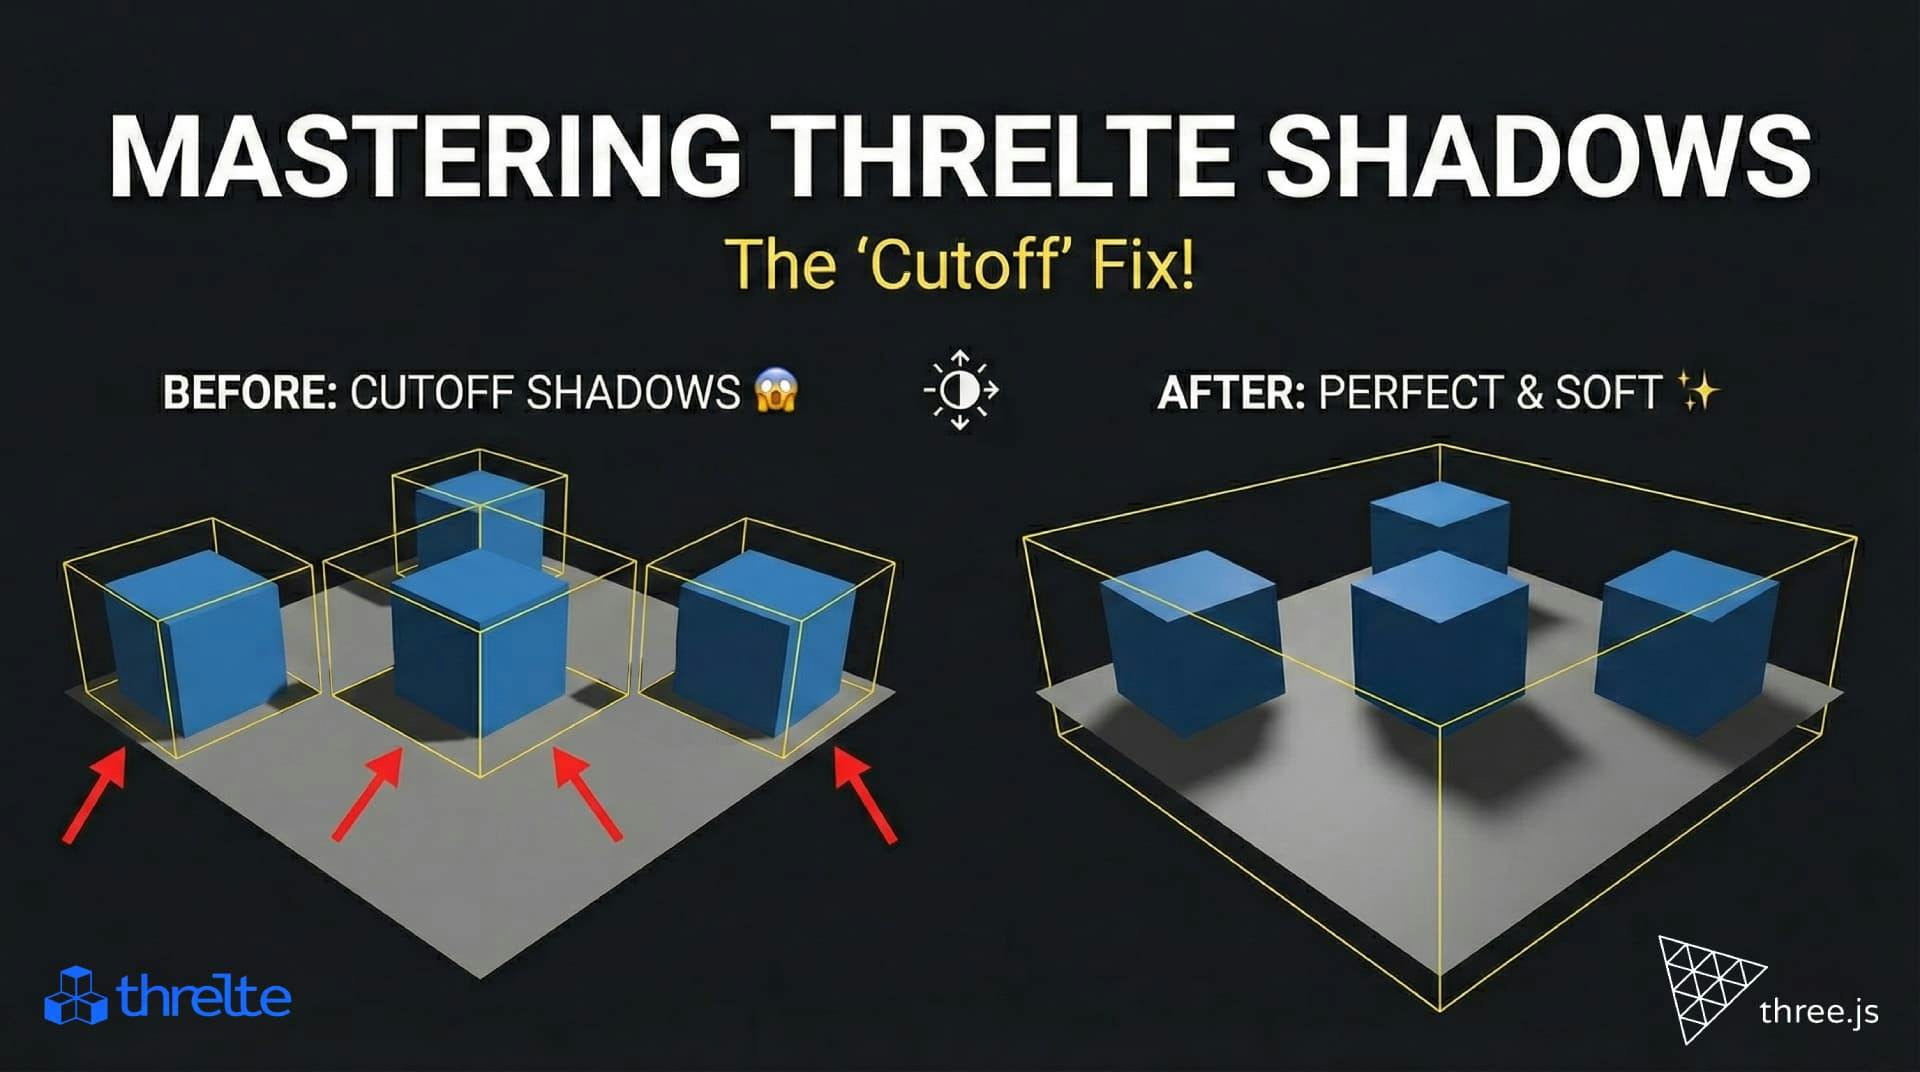
Shadows disappearing in your Threlte or Three.js scene? It’s a frustum issue. Learn how to visualize the shadow box and fix clipping instantly with this guide.

What happens when you create a DocType in Frappe? We break down the .json, .js, and .py files generated by the framework and how to use them.